The weight of invisible
Do it like a pro: a simple experiment showing how invisible gas has weight
One of the basic concepts that kids should grasp is the atomic structure of matter. Modern world has been built on our understanding of atoms, how they form molecules, and how they rearrange themselves in chemical reactions. Kids should be introduced as early as possible to the fact that life on our planet functions and evolves on a molecular level.
The complexities of these concepts can be adjusted to the kids’ age. Very young kids can just play with model kits where they construct molecules. As they grow, give them more information about the toy and start connecting home chemistry experiments with the toy models of molecules. As kids get older, sprinkle some mathematics into this, add stories about the types of chemical bonds and what game electrons play in all this.
The main message here is that young kids should not be isolated from these concepts. A big problem in education is when kids are hit by a truckload of new science terminology and concepts they have not heard about before. Some concepts they can understand only when they reach certain age, but this does not mean that they should be completely isolated from these concepts prior to that age. After all, the concept of atom is far more complicated than what they will learn in school, but this does not mean that they should never learn about atoms.
Let’s do some serious stuff
The amazing thing about universe is how the properties of matter change when atoms rearrange themselves. Pure sodium (Na) is a metal that reacts violently (often explosively) with water. Chlorine (Cl) is a poisonous gas (used on the battlefields of World War I). But when these two types of atoms come together, they form sodium chloride (NaCl), known as table salt in your kitchen. This introductory chemistry story is understandable to kids, even when they are small.
You have probably played with another popular STEM chemistry reaction – mixing baking soda and vinegar to make carbon dioxide gas. This is a great example of chemistry for kids, and we will show here how you can exploit this experiment to teach kids different levels of chemistry, physics, and mathematics. Depending on the age of your kids and their background knowledge, you can decide how far to go with the material shown here.
First, we look at the molecules we talk about. Sodium bicarbonate, known as baking soda, contains sodium, carbon (C), oxygen (O), and hydrogen (H) atoms: NaHCO₃. Vinegar is a dilute solution of acetic acid CH₃COOH in water. When they react, sodium prefers to move to the acid, which gives away its hydrogen and produces sodium acetate (NaCH₃COO). The breakdown of baking soda produces water (H₂O) and carbon dioxide gas (CO₂):
NaHCO₃ + CH₃COOH -> CO₂ + H₂O + NaCH₃COO
If you are making plastic models of molecules, explore how each molecule looks like and show this reaction equation with the models.

Fun fact to notice here is that this reaction is endothermic, which means the liquid gets colder. For comparison, think of ice cubes in water. The ice increases its temperature by absorbing heat from water. This leads to ice melting and water cooling. In a chemical reaction, the thermal energy is transferred into running the reaction, which leads to a colder water that hosts the reaction. This is a fun phenomenon to measure and explore, but more about that in one of our future episodes.
You can use some other acid for this reaction. In the examples below I used hydrochloric acid. The reaction is similar to before:
NaHCO₃ + HCl -> CO₂ + H₂O + NaCl
Safety includes goggles and this should be taken seriously because the reaction creates bubbles that can easily sprinkle acid into eyes. It is also advisable to use gloves.
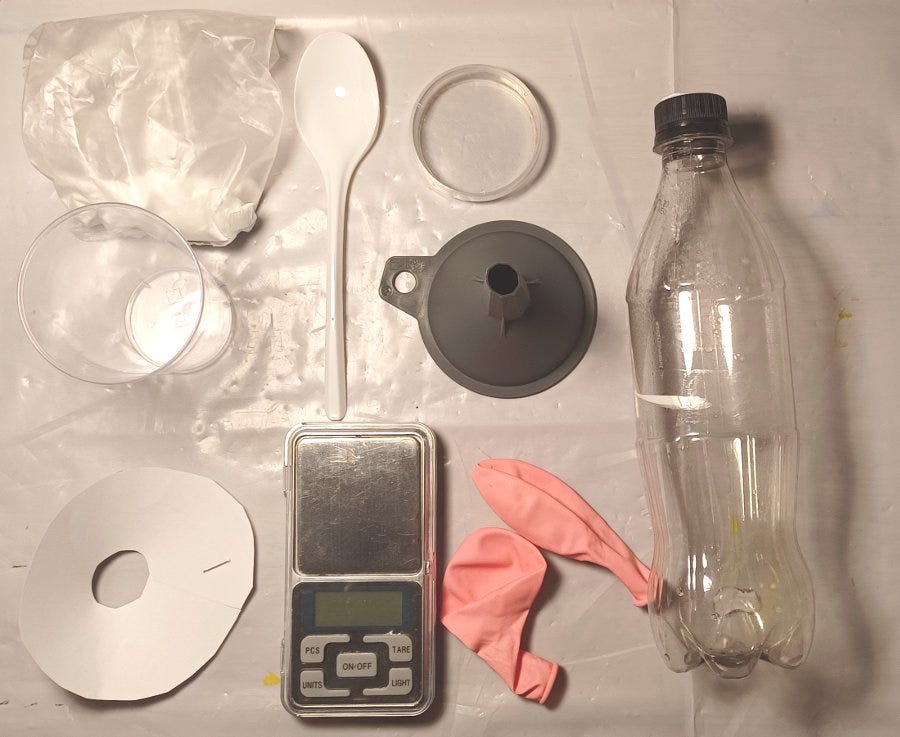
We will use a very simple set of equipment for these experiments:
A plastic cup (for holding acid)
A (paper) cover for the cup: The reaction creates bubbles, which burst and sprinkle the liquid around. The cover not only protects you from this, but it also prevents these drops from escaping the weighting procedure in the end. You can make a simple paper cover by yourself.
A digital scale (with at least 0.1 gram precision)
A small plate or container for measuring the weight of baking soda.
A small plastic bottle
Two balloons
A funnel
Safety goggles
The first set of experiments are suitable for small kids. It is about thinking where the atoms go and what it means to have a weight.
Experiment A:
Measure a couple of grams of baking soda, put that on a side.
Pour (about 20 mL) of vinegar/acid into the cup
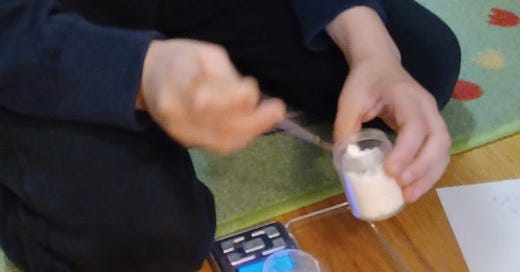
Put the cup and its cover on the scale and tare the scale (press the tare key). The scale now shows zero.
Slowly add baking soda into the cup. Be careful as the reaction gets foamy. Use the cover to prevent droplets from sprinkling out of the cup. Stir it slightly in the end to get rid of the bubbles trapped in the liquid.
When the reaction is completed, notice the weight now.

The reaction rearranges the baking soda’s atoms into new compounds. If all the atoms remain in the cup, the weight of baking soda before the reaction and the weight measured after the reaction should not change. But the weight changes – it drops because one of the new compounds is CO₂, carbon dioxide, which evaporates into the air. The weight of invisible CO₂ is equal to the drop we measured.
Experiment B:
What would happen if we trapped that CO₂ to prevent it from escaping? The weight should stay the same, of course. Let’s see this by using a balloon:
Measure a couple of grams of baking soda.
Use the funnel to pour this baking soda into the balloon.
Pour (about 20 mL) of vinegar/acid into the bottle.
Put the bottle and the empty balloon on the scale and tare the scale (press the tare key). The scale now shows zero.
Attach the balloon with baking soda to the bottle, but keep the balloon hanging off to the side, such that soda is not falling into the bottle. Make sure that the balloon is tightly gripping the bottle.
Now tip the balloon to drop the baking soda into the bottle. The released CO₂ starts to inflate the balloon, but it cannot escape into the air. When the reaction is finished, look at the weight. Is the really the same as the weight of baking soda before the reaction?

Surprise, surprise: the weight is lower again! Except that this time not as much as before. What is going on here? The answer is very interesting – we trapped the released CO₂ but allowed the volume of our container that holds CO₂ to change. Here we encounter a difference between weight and mass.
Mass is an intrinsic property of matter. A rock of 1 kg has this mass regardless of if it being on the surface of a planet or in the emptiness of universe. Weight, on the other hand, is a measure of the gravity force acting on the rock on the surface of a planet. We measure this force using our scale, but there is another force that acts against the gravity – buoyancy.
In our previous episode we described how this force operates – the key step is displacement of air. When the balloon gets inflated, CO₂ replaces a part of the volume previously occupied by air. This change of the volume creates a change in the buoyancy force, which is now higher than in the beginning when we had only the volume of the bottle alone.
In the previous experiment we let this CO₂ to be removed, but this time the scale feels the weight of the CO₂ and the change in buoyancy. Let’s try now a third experiment, where we prevent the change of volume.
Experiment C:
In this attempt, we will trap CO₂ in a bottle that will be sealed. There will be no change of volume this time. The steps are:
Measure a couple of grams of baking soda.
Pour (about 20 mL) of vinegar/acid into the bottle.
Make a small paper pocket in the bottle neck. Put the bottle, paper pocket, and bottle cap on the scale and tare the scale (press the tare key). The scale now shows zero.
Use the funnel to pour the measured baking soda into the pocket.
Seal the bottle using the cap but be careful not to grip on the paper pocket inside.
Shake the bottle such that the paper pocket drops in the acid and starts the reaction.
CO₂ is released, but it cannot escape the bottle. Put the bottle back on the scale and observe the weight.
This time the weight is really the same. You can notice that the bottle is pressurized because of all the extra CO₂ gas inside.

Experiment D: do it like a scientist!
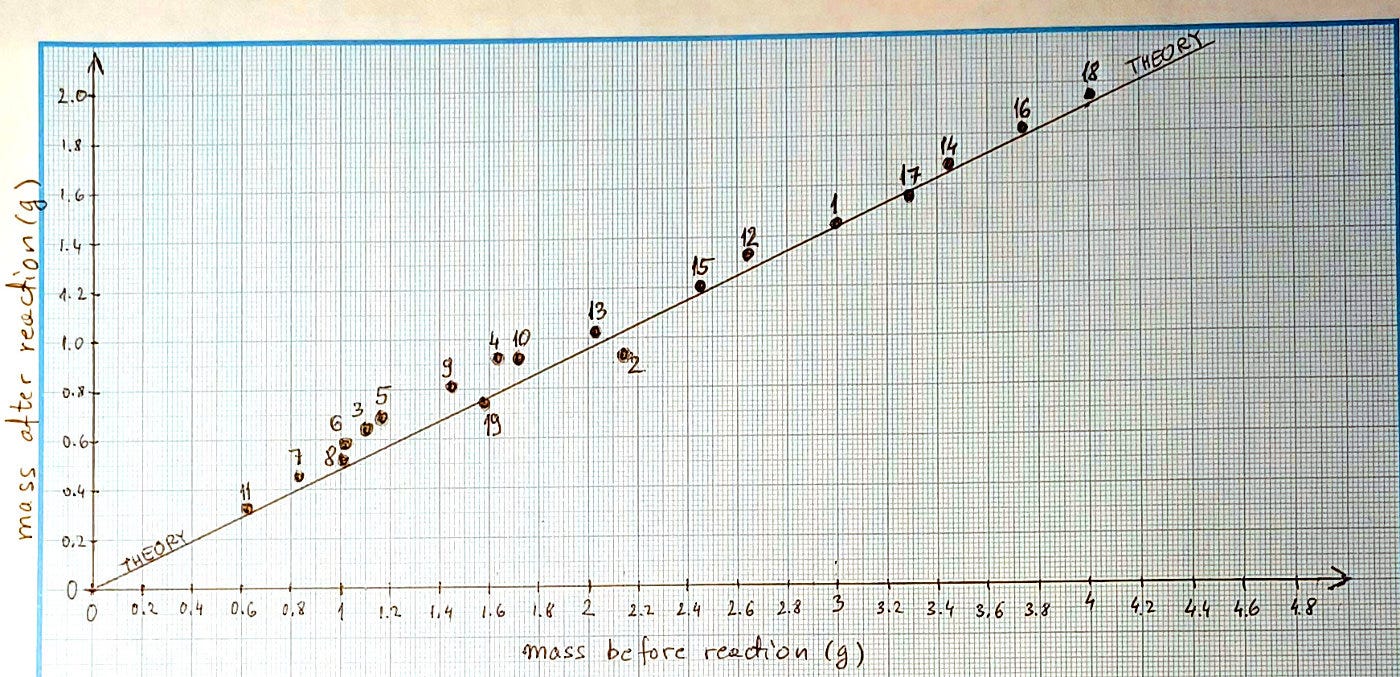
Now we make a step further and approach this experiment like a real scientist. This means we will take measurements, analyze it, and compare it with theory. The actual experiment is the same as in the version A, except that now we repeat it many times. I would recommend at least ten repetitions, each with a different starting mass of baking soda.
Each time we write down two numbers: the weight of baking soda before the reaction and the weight after the CO₂ escaped. Make sure you get rid of small bubbles when the reaction ends and that you don’t lose tiny droplets sprinkling out of the cup. This will increase the measurement precision. You can also mark each measurement with its ordinal number and write down a note if you notice something that might have influenced the experiment.
When you have collected enough data, take a graph paper, and draw two axes – one for the mass before and another for the mass after the reaction. Put your measurements into the graph. Notice how they follow a linear trend.
Finally, what does the theory say? Chemists know the mass of each atom in baking soda, but single atoms have very small values. Therefore, when speaking of mass of some substance, chemists agreed to work with the mass of 6.02214076×10²³ particles, whatever the particles are (atoms, molecules, electrons, …). This number is known as the Avogadro number, and the unit for that amount of substance is called the mole (symbol: mol). So, 1 mol of baking soda molecules NaHCO₃ is calculated from the molar mass of individual atoms:
Molar mass of Na = 23 g/mol
Molar mass of H = 1 g/mol
Molar mass of C = 12 g/mol
Molar mass of O = 16 g/mol
Molar mass of NaHCO₃ = 23+1+12+3*16 = 84 g/mol
After the reaction, CO₂ left the system. We know the molar mass of CO₂ = 12+2*16=44 g/mol. This means that the mass after the reaction drops to (84-44)/84=47.6% of the starting mass before the reaction. This is a line in the above-mentioned graph: y axis = 0.476 * x axis.
It is fun now to observe the quality of our measurements. You might notice various situations:
Your points are above the line: typically, if CO₂ bubbles remained in the liquid.
Your points are below the line: mostly the reason is that you lost some of the liquid because of droplets splashing out of your measurement cup.
Some points drastically above or below the line: some major mishap happened during the experiment (e.g., when all the acid had reacted, and some undisintegrated baking soda remained).
If your kid remained focused throughout this kind of activity, then you know a fire of an explorer is burning in his/her little heart!


I've done that practice yesterday at the workshop with 10-12 year old children and results were great! We have practiced atom structure with mikado-sticks (from the board game NTC-hemikado).